Appendix C: Setting up Check-in for Child Check-in
1. Simple setup (default)
Check-in is already set-up by default in a way that you could use for Child Check-in if you wanted to simply register children as being present for a single group. To get started, simply create your event in the same group where all your children are members.
Check-in Profiles
full details
-
Just the default profiles - only "Default (no labels)" is used by default - see below.
Check-in Global Settings
full details
-
All settings left default:
-
Check-in Profile will be "Default (no labels)" for all events and all groups (you could change this to "Default (Child Check-in)" if you wanted to use labels)
-
"Automatically include Event group in Check-in" will be ticked, so by default the people expected to Check-in to an event will be the members of the group where the event is saved
-
Leader password will be a randomly generated code specific to your site
Check-in Group Settings
full details
-
All settings inherit from the Global Settings
Check-in Event Settings
full details
-
All settings inherit from the Global Settings (Profile, Open Time & Close Time inheirt via the Group Settings, but they too are inheriting from the Global Settings)
With these settings, all Events on your site will be available for Check-in (just go to www.yoursite.org/checkin) and the list of expected children will be the members of whichever group the event is in.
2. Typical setup
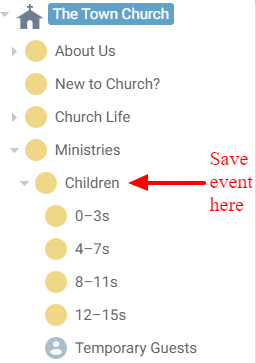
This assumes that you have set up your database with children's groups that look something like this:
Check-in Profiles
full details
-
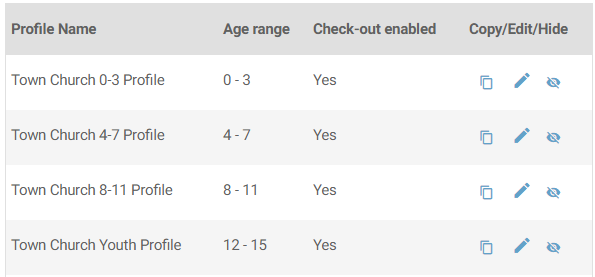
Create a specific Check-in Profile for each age group
-
You can do this quickly by copying the "Default (Child Check-in)" profile to create the first one, then copy the one you just made for the next one etc.
-
For each age-group-specific Check-in Profile:
-
Set a suitable profile name e.g. "Creche"
-
You'll probably want to enable Separate Registration & Check-in and Allow Guests
-
Set the Check-in Close email notification to go to the relevant group leader (cc. to your Children's worker if required)
-
Set the specific Terms & Conditions article for each group, and also any Additional Profile Information, mandatory Custom Fields and Consent Questions
-
Add any labels you want printed for this age group
-
For most age ranges, you'll probably want:
-
a Child Label and Guardian Label to print when a Child registers
-
a Leader label when a Leader registers
-
a Name Label when it's an Adult at Children's group (e.g. a child's guardian accompanies them into the group)
-
You may also want one or more bag labels to print when a Child registers for very young children
Check-in Global Settings
full details
-
Under Inheritable Settings:
-
You'll want to set Check-in Profile, and perhaps all other Inheritable Settings, at a group-specific level rather than here
-
If you're only using Check-in for Child-Checkin for your children's groups, then you may want to disable Check-in at this top level, and then enable it only for specific groups
-
Under Site-wide Settings:
-
Set your label logo
-
Set your MADI field to the custom field that you already use to store that information (or create one)
-
Set your Group to Store One-off Guests, if you want to retain them after each event, to a suitable group - in the example above, we have created an independent group specifically for this
Check-in Group Settings
full details
For the main
Children group:
-
Untick "Automatically include Event group in Check-in" (as you will want to add each sub-group separately instead so they can use their age-specific Check-in Profiles)
-
Set the leader term that will apply to all events added to this group (example: Kids Team)
-
Set the kiosk background that will apply to all events added to this group
For each of the
age-specific sub-groups:
-
Set the Check-in Profile to the age-specific profile that you created earlier
-
If one group (e.g. Creche) always opens its check-in earlier than the others, you can specify open and close times here
-
These settings will apply any time this group is included in check-in for an event. So if you have a creche at more than one event during the week, every time you add the creche group to an event check-in, it will use the profile you set for the creche group here.
Check-in Event Settings
full details
-
On the Check-in Groups tab, click Set Check-in Groups and tick only the age-specific sub-groups, then save. If the event is part of a series, you can now click Copy to future events in series.
-
If the particular event needs any specific Check-in settings just for this event (or all events in the series), you can set them on the Check-in Settings tab.
When the Check-in is open, you should be able to go to [www.yoursite.org/checkin] and see that the Event is showing with all the age-specific sub-groups set to use their custom Check-in profiles.